
No products in the cart.
Car DIY
Step-by-Step Guide to Brake Pad and Rotor Replacement for DIY Enthusiasts
How to Replace Brake Pads and Rotors: A Step-by-Step Guide
If you’ve ever felt a little uncertain about your car’s ability to stop on a dime, it might be time to consider replacing your brake pads and rotors. Regular maintenance of your vehicle’s braking system is not only essential for your safety but also for the safety of those sharing the road with you. In this comprehensive guide, we’ll walk you through the process of replacing your brake pads and rotors, ensuring your vehicle stops reliably.
Why Brake Maintenance Matters
Before we dive into the nitty-gritty of brake pad and rotor replacement, let’s take a moment to understand why it’s crucial. Your car’s brakes are its primary safety feature, and their proper functioning is non-negotiable. Over time, brake pads and rotors wear down, reducing their effectiveness. Regular inspections and timely replacements are vital to ensure your brakes work optimally.
Getting Started: Tools and Materials
To embark on this DIY journey, you’ll need the following tools and materials:
- Jack and jack stands: These will help you safely lift and support your vehicle.
- Lug wrench: For removing the wheel nuts.
- Socket set: To tackle bolts and caliper fasteners.
- C-clamp or brake caliper tool: Necessary for compressing the caliper piston.
- Brake cleaner: For cleaning brake components.
- New brake pads and rotors: Ensure they match your vehicle’s make and model.
- Brake fluid: To top up the brake reservoir if needed.
Preparing Your Workspace
Safety is paramount when working on your vehicle. Take these steps to ensure your workspace is ready:
- Choose a flat, well-ventilated area: This provides a safe and comfortable workspace.
- Safety gear: Wear gloves and safety glasses to protect yourself from debris and chemicals.
- Secure the vehicle: Engage the parking brake and use wheel chocks to prevent any movement.
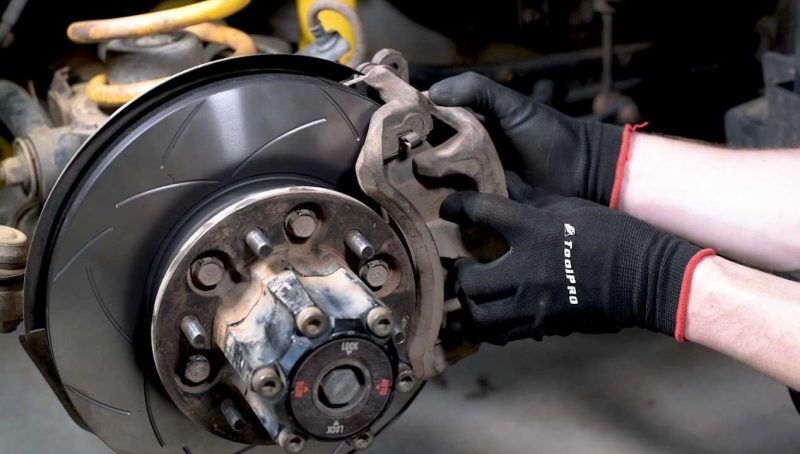
Removing the Old Brake Components
Now let’s delve into the heart of the matter:
- Loosen the wheel nuts: Utilize the lug wrench to loosen the nuts but refrain from removing them entirely.
- Lift the vehicle: Employ the jack to raise your vehicle safely off the ground, then secure it with jack stands.
- Wheel removal: Remove the loosened wheel and set it aside.
- Access the brake assembly: Locate the brake caliper and bracket situated behind the rotor.
- Caliper removal: Use your socket set to extract the bolts holding the caliper in place.
- Compress the caliper piston: Deploy the C-clamp or brake caliper tool to gently compress the caliper piston.
- Remove old brake pads: Slide them out from the caliper bracket.
- Take off the rotor: If required, remove any bolts securing the rotor to the hub.
Installing the New Brake Components
It’s time to infuse new life into your vehicle’s braking system:
- Attach the new rotor: If you removed the old rotor, bolt the new one onto the hub.
- Insert the new brake pads: Nestle them into the caliper bracket.
- Reattach the caliper: Slide the caliper back over the brake pads and secure it with the bolts.
- Tighten everything: Ensure all bolts are securely fastened.
- Repeat on the other side: If you’re replacing both sides, repeat the process on the opposite wheel.
Wrapping It Up
- Double-check everything: Examine all bolts to ensure they’re tightened correctly.
- Reattach the wheels: Place the wheels back on and tighten the nuts in a star pattern.
- Lower the vehicle: Gently lower your vehicle to the ground.
- Test your brakes: Before hitting the road, press the brake pedal gently to ensure it feels firm.
- Top up brake fluid: If needed, add brake fluid to the reservoir.
- Breaking in the brakes: Adhere to the manufacturer’s instructions for breaking in your new brake pads and rotors.
In conclusion, maintaining your vehicle’s brakes is essential for safety. By following this step-by-step guide, you can replace your brake pads and rotors with confidence, ensuring your vehicle stops reliably when you need it to. Regular brake maintenance not only keeps you safe but also extends the lifespan of your braking system. So, don’t delay; give your vehicle the stopping power it deserves today!
FAQs
1. How often should I replace my brake pads and rotors?
Brake pads typically need replacement every 30,000 to 70,000 miles, while rotors can last longer, often up to 70,000 miles or more. However, these figures can vary depending on your driving habits and vehicle type.
2. Can I replace my brake pads and rotors myself?
Yes, you can replace your brake pads and rotors yourself if you have the necessary tools and some mechanical aptitude. However, if you’re not comfortable with DIY car maintenance, it’s best to consult a professional mechanic.
3. What are the signs that my brake pads and rotors need replacement?
Some common signs include squeaking or squealing noises when you brake, reduced braking performance, a vibrating steering wheel when you brake, or visible damage and wear on the brake components.
4. How long does it take to replace brake pads and rotors?
The time required for this task can vary depending on your experience, the tools you have, and the condition of your vehicle. On average, it may take a few hours to complete the job.
5. Can I reuse my old brake pads when replacing the rotors?
It’s not recommended to reuse old brake pads when replacing the rotors. Since the pads have already conformed to the shape and wear pattern of the old rotors, using them with new rotors may result in uneven braking and reduced performance. It’s best to install new brake pads when replacing the rotors for optimal safety and performance.